How to Upload Your Existing World to Your 7 Days to Die Server
Move a single-player 7 Days to Die world to your dedicated server: which folders to copy from %APPDATA%, where they go, and the GameWorld and GameName keys.
Yes — a single-player or co-op 7 Days to Die world moves onto a dedicated server. A save is two things: the world (the map itself) and the save game (your progress on it), and the server finds each by name. Copy the right folders, make two names match, and your Day 40 base comes up exactly where you left it.
The move runs through the File Manager of your 7 Days to Die server panel, plus two keys in serverconfig.xml. Because a 7DTD save is thousands of small region files, zip it locally and use the File Manager's Decompress option — it turns an hour of transfer into minutes.
Where 7 Days to Die Stores Local Saves
| Platform | Save root |
|---|---|
| Windows | %APPDATA%\7DaysToDie\ |
| Linux | ~/.local/share/7DaysToDie/ |
| macOS | ~/Library/Application Support/7DaysToDie/ |
Under that root:
Saves\<WorldName>\<SaveName>\— your progress. Inside it,main.ttwis the world-state file,Player\holds one.ttpper player keyed by Steam ID, andRegion\holds the terrain inr.<x>.<y>.7rgchunk files. The world folder wraps the save folder.GeneratedWorlds\<WorldName>\— the map data for worlds you generated with RWG (random world generation).SavesLocal\— client-side data from servers you joined; not part of this move.
The maps that ship with the game — Navezgane and the Pregen06k* / Pregen08k* worlds — are already on the server, so they never need the GeneratedWorlds half. Which folders you need depends on the world type:
| Your world is… | Copy Saves\… |
Copy GeneratedWorlds\… |
|---|---|---|
| Navezgane or a shipped Pregen map | Yes | No — the server ships these maps |
| RWG (a generated map) | Yes | Yes |
Step 1: Find and Zip Your Save
Locate Saves\<WorldName>\<SaveName>\ — for an RWG world the world name looks like the generated map name, and the save name is what you typed when creating the game. If it's RWG, also locate GeneratedWorlds\<WorldName>\.
Zip each folder (the folder itself, not just its contents) so the structure survives the trip.
Step 2: Stop the Server
Click Stop on the Console tab and let it exit fully — 7 Days to Die writes its save on shutdown, and uploading into a live save directory is how corruption happens.
Step 3: Upload Both Folders
Both destinations sit at the root of your server volume, the same place serverconfig.xml itself lives. In the File Manager:
Upload the world zip to
GeneratedWorlds/and Decompress it there, so the world ends up atGeneratedWorlds/<WorldName>/. (RWG worlds only — skip for Navezgane and the shipped Pregen maps.)Upload the save zip to
Saves/and decompress, so your progress ends up atSaves/<WorldName>/<SaveName>/.
For multi-GB saves, SFTP to the same paths is more robust than the browser.
Step 4: Point the Server at Your World
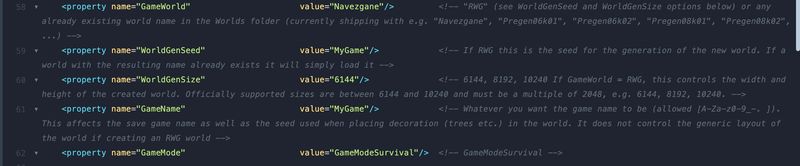
Two values in serverconfig.xml must match what you uploaded, character for character — on Linux, capitalisation counts. Open the file in the File Manager; it sits at the root of your server volume.
GameWorld: set it to your world's folder name. For an uploaded RWG world that's the folder name underGeneratedWorlds/; for Navezgane it's justNavezgane. This is the same workflow the serverconfig.xml reference documents for community maps — "setGameWorldto the map's exact name, capitalisation included".GameName: set it to your save folder's name. This is the name of your progress within the world — leave it at the default and the server starts a fresh game on your uploaded map.
WorldGenSeed and WorldGenSize only matter when the server is generating a new world; once GameWorld names an existing one, a seed change takes effect only on a new world.
Save the file and restart — serverconfig.xml is read at startup, so nothing applies to a running server.
Step 5: Start and Verify
Hit Start and watch the Console come up — the boot output includes the world it resolved. Then join and check the in-game day counter and your base. Once it's confirmed, take a snapshot from the Backups tab so the migrated state is your rollback point.
Common Issues
- The server started a brand-new game on my map:
GameNamedoesn't match your save folder's name. World loading and save loading are separate lookups; the map can be right while the progress is not. - "World not found" or RWG starts generating: The
GeneratedWorlds/<WorldName>/folder is missing, misplaced, or its name doesn't matchGameWorldexactly (case included). - I can't find
Saves/on the server: They are created on first boot, so start the server once and look again.serverconfig.xmlhas aUserDataFolderproperty that relocates the whole tree, but it ships commented out with no default, so on a stock server the folders are at the root. - The save is from an older major version: A minor-version gap only warns; a different major version is a hard block, and the game says so — "This game cannot be continued with this game version". Separately, V3.0 moved thirty gameplay properties out of
serverconfig.xmlinto the encodedSandboxCode, so an old world's settings do not survive the jump untouched. The serverconfig.xml reference covers that migration. - The world came from an overhaul mod: Darkness Falls and friends change world data — the server needs the identical overhaul installed before it can load the world. See How to install Modlets and Overhaul Mods.
What to Read Next
- 7 Days to Die default serverconfig.xml for
GameWorld,GameNameand the V3SandboxCodemigration - Managing your 7 Days to Die server for the backup schedule that should follow this upload
- 7 Days to Die Configuration guide for ports, connecting, and the rest of first-day setup
Made with 💜 by GameServerKings

Need a 7 Days to Die server?
Deploy an instantly-provisioned 7 Days to Die server on high-clock hardware — DDoS protected, no contracts, cancel anytime.
From $12.00 /month