Minecraft World Management: Seeds, Pre-generation, Borders and Resets
Manage your Minecraft world: pick a seed, pre-generate chunks to cut lag, set a world border, reset the Nether or End, and upload a singleplayer world.
The world is the only thing on a Minecraft server that cannot be re-downloaded. Jars, plugins and configs are all replaceable; the world is not. This guide covers the jobs that actually come up on a running Minecraft server: picking a seed, pre-generating chunks so exploration stops causing lag, setting a world border, resetting the Nether or the End without touching the overworld, wiping individual chunks, moving a singleplayer world onto the server, and running more than one world at once.
It applies to Java Edition. Setup and server.properties basics are in Getting started with your Minecraft server; the in-game commands used below are covered in full in Minecraft Server Commands.
Take a backup before every operation on this page
Every task here either deletes world data or changes how it generates. Snapshot the server from the Backups tab first — see How to create a backup. A backup taken thirty seconds earlier is the difference between a mistake and an incident.
Seeds: Choosing One and Living With It
A seed is the number the world generator starts from. The same seed and the same generator produce the same terrain every time, which is why seeds get shared.
Set it in server.properties before the world first generates:
level-seed=
level-name=world
level-type=minecraft\:normal
generator-settings={}| Key | Default | What it does |
|---|---|---|
level-seed |
blank | The seed for the generated world. Blank means random |
level-name |
world |
The world's name and its directory path. If a valid world already exists at that path, it is loaded; otherwise a new one is generated there |
level-type |
minecraft:normal |
The world preset. Also accepts minecraft:flat, minecraft:large_biomes, minecraft:amplified and minecraft:single_biome_surface |
generator-settings |
{} |
Customises generation, and what it accepts depends on level-type. Used mainly with minecraft:flat |
level-type and generator-settings have a page of their own: Minecraft Flat and Custom World Types covers every preset value, the superflat generator-settings JSON and why changing either one later does nothing. Every other key in the file is covered in Minecraft server.properties: The Complete Reference.
Two things about seed values are worth knowing before you paste one in.
Words are not free seeds. A seed can be a number or a word or phrase. If it is anything other than a plain number, Minecraft runs it through Java's String.hashCode() and gets a 32-bit integer out — which limits you to roughly 4.29 billion possible worlds instead of the 18.4 quintillion a numeric or blank seed can reach. Fine if you are copying a specific seed someone published; pointless if you just want variety.
Seeds are only reproducible within a version. Every time Mojang changes world generation, the same seed produces different terrain. A seed screenshot from a 1.20 video will not give you that world on a 26.x server. Check what version a seed was captured on before you build a server around it.
To read the seed of a world that already exists, run /seed from the panel Console or in-game as an operator.
Changing
level-seedon an existing world does not reroll itThe chunks already saved to disk stay exactly as they are. Only newly generated chunks use the new seed, which leaves a hard, obvious seam wherever old terrain meets new. If you want a genuinely new world, change
level-nameto a new value instead — the server generates a fresh world in a new folder and your old one is still sitting there if you change your mind.
Where Your World Actually Lives
This is the part most guides get wrong, because the layout changed recently and almost nothing on the internet has caught up.
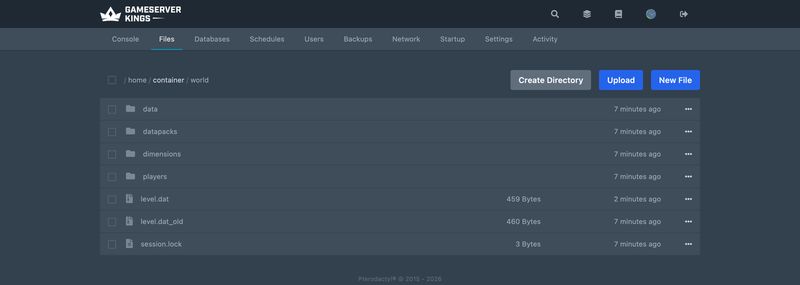
Minecraft 26.1 restructured the entire world save format. The DIM-1 and DIM1 folders that every older tutorial tells you to delete no longer exist. Dimensions now live under a dimensions folder, namespaced:
| Data | 26.1 and later | 1.21.11 and earlier |
|---|---|---|
| Overworld region files | world/dimensions/minecraft/overworld/region/ |
world/region/ |
| Nether | world/dimensions/minecraft/the_nether/ |
world/DIM-1/ |
| The End | world/dimensions/minecraft/the_end/ |
world/DIM1/ |
| Player saves | world/players/data/ |
world/playerdata/ |
| Advancements | world/players/advancements/ |
world/advancements/ |
| Statistics | world/players/stats/ |
world/stats/ |
| Scoreboard | world/data/minecraft/scoreboard.dat |
world/data/scoreboard.dat |
| Force-loaded chunks | chunk_tickets.dat |
chunks.dat |
The top-level data folder is now only for data shared between dimensions, everything in it is namespaced, and map files moved to data/minecraft/maps/ with plain numeric names (map_1.dat became 1.dat).
Paper follows the same layout. Paper's current documentation puts per-world configuration at world/dimensions/<namespace>/<key>/paper-world.yml — for example world/dimensions/minecraft/the_nether/paper-world.yml. Before the change, the same file lived at world_nether/paper-world.yml, because Bukkit-based servers used to split the three dimensions into separate top-level folders called world, world_nether and world_the_end.
Look in the File Manager before you delete anything
Which layout you have depends on the jar version your server is running right now, not on what your host's control panel is called. Open the File Manager, look inside your world folder, and confirm whether you see
dimensions/orDIM-1/before following any instruction that names a folder — including the ones below.
Regardless of layout, a world folder is identified by its level.dat. You will also see level.dat_old (the previous save, kept as a rollback) and session.lock, which the server uses to claim write access to the world. Never edit those by hand.
Pre-generating Chunks
This is the single highest-value thing you can do to a new world, and most server owners never do it.
When a player walks into terrain the server has never generated, the server has to build it — noise generation, structure placement, cave carving, biome assignment — while also running everything else. On a fresh world with several players exploring in different directions, that is the dominant cost on the server, and it shows up as exactly the lag people blame on plugins — see Diagnosing Minecraft Server Lag for how to confirm that is what you are looking at. Pre-generation moves that work to a time when nobody is playing. After it, exploring is a disk read instead of a computation.
The standard tool is Chunky, which runs on Spigot, Paper, Purpur, Fabric, Forge, NeoForge, Folia and Sponge and is kept current with Minecraft releases. Older packs bring their own tool: an RLCraft server on Forge 1.12.2 pre-generates with Chunk Pregenerator, as its readme recommends.
Download Chunky for your server type from Modrinth (
modrinth.com/plugin/chunky) or Hangar.Upload it to
plugins/(ormods/on Fabric, Forge or NeoForge) and restart. Plugin installation in detail is in How to install plugins for Minecraft Java Edition; mods are in How to install mods.Set a radius and start, from the panel Console:
> chunky radius 5000
> chunky start
Watch progress:
> chunky progress
The radius is in blocks and accepts shorthand — 10k for 10,000 blocks, 625c for 625 chunks. Chunky's own documentation is blunt about sizing: "If in doubt start with a smaller radius like 5000 first and increase it later if you need to." A 5,000-block radius is already a very large survival map, and generation time and disk usage both climb fast beyond it.
Useful commands while it runs:
| Command | What it does |
|---|---|
chunky world <world> |
Choose which world to work on. Use tab completion — world names changed with the 26.1 restructure, so do not type one from an old guide |
chunky shape <shape> |
Set the shape of the area, e.g. square or circle |
chunky center <x> <z> |
Set the centre point in block coordinates |
chunky radius <radius> |
Set the radius in blocks |
chunky start |
Begin, or resume the current selection |
chunky pause / chunky continue |
Stop and resume without losing progress |
chunky cancel |
Stop and discard the task's progress |
Pre-generate before anyone joins, and do the Nether too
Chunky's guidance is to "pre-generate before players join your server" — it is faster and there is no gameplay to disturb. Do the Nether as well: it is eight times denser in travel terms, so a 5,000-block overworld only needs a 625-block Nether to cover the same ground. That same 8:1 ratio decides where an overworld portal comes out, so if you are placing the pair by hand the Nether portal calculator does the arithmetic in both directions. If you run a map plugin, turn it off for the duration; it makes the run faster and produces better maps afterwards.
Pre-generation is a large, sustained disk write. Expect the server to feel busy while it runs, and run it against a radius you have actually decided on — which is where the world border comes in.
The World Border
Pre-generating without a border is how servers end up with 200 GB worlds. The border is what makes the pre-generated area the map rather than a head start.
The border is set per dimension. /worldborder only affects the dimension it is run in, so an overworld border does not constrain the Nether, and it does not scale itself by the 1:8 ratio either. Run it separately in each.
| Command | What it does |
|---|---|
/worldborder set <distance> [<time>] |
Set the border's width in blocks. With <time>, it grows or shrinks gradually — that value is in ticks, so write 60s if you mean sixty seconds |
/worldborder add <distance> [<time>] |
Increase or decrease the width by an amount |
/worldborder center <x> <z> |
Recentre the border. Initial centre is 0, 0 |
/worldborder get |
Report the current size |
/worldborder damage amount <n> |
Damage per second per block outside the buffer. Default 0.2 |
/worldborder damage buffer <n> |
How far outside the border before damage starts. Default 5 blocks |
/worldborder warning distance <n> |
Red screen tint within this many blocks of the border. Default 5 |
/worldborder warning time <n> |
Red screen tint this many ticks before a shrinking border reaches the player. Default 300 ticks, which is 15 seconds |
/worldborder needs permission level 2. The default border width is 59,999,968 blocks.
settakes the width, not the radius
/worldborder set 10000gives a 10,000-block square — 5,000 blocks from the centre in each direction. That matcheschunky radius 5000, which is a radius. Getting these two confused is why people pre-generate four times more world than their border will ever expose.
There is also a hard ceiling in server.properties:
max-world-size=29999984max-world-size is the number of blocks from the centre of the world at which the border appears, and it accepts 1 to 29999984. Setting the border larger than this succeeds as a command but the border does not actually move past the limit. Raising max-world-size above the default does nothing.
Resetting the Nether or the End
A perfectly reasonable thing to want: the overworld holds everyone's builds, but the Nether has been strip-mined and the End's outer islands are picked clean. You can reset one dimension and leave the others alone.
Take a backup. The dimension you are about to delete contains player storage — ender chests are not in it, but everything in a Nether base is.
Stop the server from the Console tab and wait for the process to exit. Deleting world files under a running server corrupts the save.
In the File Manager, delete the dimension's folder:
- On 26.1 and later:
world/dimensions/minecraft/the_netherorworld/dimensions/minecraft/the_end - On 1.21.11 and earlier, vanilla:
world/DIM-1orworld/DIM1 - On 1.21.11 and earlier, Paper/Spigot/Purpur: the separate
world_netherorworld_the_endfolder
If you would rather be conservative, delete only
region,entitiesandpoiinside the dimension folder and leave itsdatafolder alone.- On 26.1 and later:
Start the server. The dimension regenerates from the same seed the next time someone enters it.
Tell your players first, and be specific about what they lose:
- Everything built or stored in that dimension, including items in chests and shulkers left there
- Beds and respawn anchors set in the Nether, so anyone whose spawn point was there respawns at world spawn
- Portal linking. Existing overworld portals will link to freshly generated Nether terrain, so the destination moves. Expect some portals to come out inside stone
- In the End: the dragon fight resets, which is usually the point
Terrain regenerates identically only if the seed and the generator are unchanged. If the server has been through a version upgrade with a world-generation change, the new Nether will not match the old one at the boundaries — which does not matter after a full dimension reset, but matters a lot in the next section.
Deleting or Regenerating Specific Chunks
Sometimes you want a surgical fix: a corrupted chunk that crashes the server, a griefed area with no rollback, or old terrain that predates a feature you want to appear.
Deleted chunks regenerate when a player next loads that area, and they regenerate identically as long as the seed and generator have not changed. If either has changed, the regenerated chunks will not match their neighbours, and you get visible cliffs and sliced caves along the boundary. That is exactly why people delete outer chunks after a version upgrade — to let new biomes and structures appear in an old world — and it is why doing it in the middle of a built-up area looks terrible.
The practical tool is MCA Selector (github.com/Querz/mcaselector), a desktop application that opens the world's region files, shows them on a map, and lets you select and delete chunks or whole regions. Version 2.8, released June 2026, is updated for Minecraft 26.2.
The workflow is: stop the server, download the world folder over SFTP, open it in MCA Selector, select and delete, upload the changed region files back, start the server. Take the backup before the download, not after.
Two related commands are worth knowing. /forceload add <from> [to] keeps chunks loaded permanently — useful for a farm that must keep running with nobody nearby, and a genuine performance cost if you forget about it. /forceload remove <from> [to] undoes it. Force-loaded chunks are recorded in the world's chunk_tickets.dat, which was called chunks.dat before 26.1.
Uploading an Existing Singleplayer World
Moving a world you started on your own PC onto the server is a straightforward file copy, with one setting to match.
Find the world on your computer. Java Edition worlds live in the saves folder of your game directory:
| Platform | Path |
|---|---|
| Windows | %APPDATA%\.minecraft\saves\ |
| macOS | ~/Library/Application Support/minecraft/saves/ |
| Linux | ~/.minecraft/saves/ |
Those are the defaults; a launcher can put .minecraft anywhere, and modpack launchers routinely do. If the folder is not there, check the installation's game directory setting in your launcher. On Windows you can paste %APPDATA% into the Explorer address bar; on macOS use Go → Go to Folder… in Finder, since ~/Library is hidden by default.
Inside saves you will find one folder per world, each containing a level.dat. That whole folder is the world.
Then:
Take a backup of the server as it stands, so you can get back if the upload goes wrong.
Stop the server and wait for it to exit fully.
Upload the world folder into the server root via the File Manager, or over SFTP for anything above a few hundred megabytes — SFTP is faster and resumes interrupted transfers. Upload the folder, not its contents.
Point the server at it. In
server.properties, setlevel-nameto the folder's exact name:level-name=MyWorldThe value is a directory path, so it must match the uploaded folder exactly — capitalisation included, since the server runs on Linux. Alternatively, rename the uploaded folder to
worldand leavelevel-namealone.Start the server and check the Console for it loading rather than generating. Then join and confirm you land somewhere you recognise.
What to expect once you are in — the short version; the differences that catch people out are covered in full in Converting a Singleplayer World to a Minecraft Server: What Changes:
- Your inventory and position may not carry over. Singleplayer player data is stored under the world's player storage, keyed to your account UUID. If your singleplayer world was offline or from a cracked launcher, the UUID will not match your online account and you will spawn as a new player in your own world. The builds and the terrain are all there, and the old save is still on disk under the old UUID — Editing Minecraft Player Data covers working out which file belongs to whom.
- Ops do not transfer.
ops.jsonis a server file, not a world file. Op yourself again from the Console withop YourUsername. - Game rules do transfer, because they are stored inside the world save rather than in a config file.
- The world must not be newer than the server. A world last opened on a 26.2 client will not load on a server still running a 1.21.x jar. Match the server version to the client that last saved the world, or upgrade the server first.
- Modded worlds need the same mods. A world saved with a modpack will not load cleanly on a plain Paper server. Install the matching pack first — see How to install mods for Minecraft Java Edition or How to Install a Minecraft Modpack Server.
Do not upload into a running server
The server holds the world open and writes to it on its own save cycle. Copying files underneath it produces a save that is half yours and half the server's, and the resulting corruption is usually not recoverable. Stop first, every time.
Downloading Your World
The reverse direction matters just as much, because a backup you cannot see is not a backup.
The Backups tab snapshots the whole server volume and is the right primary tool — it is covered in How to create a backup. For an off-platform copy, run save-all from the Console (or stop the server) and pull the world folder down over SFTP. A monthly download to your own storage is the standard recommendation in Managing your Minecraft server, and it is the one that survives problems the panel itself cannot fix.
To open a downloaded server world in singleplayer, drop the folder into your local saves directory. Expect the same UUID caveat in reverse.
Multi-World Setups
There are two genuinely different things people mean by "more than one world", and they have different answers.
Several worlds on one server. A resource world that gets wiped monthly, a creative plot world, a minigame arena. On Paper, Spigot or Purpur this is what Multiverse-Core is for: it creates, loads, imports and unloads worlds at runtime, gives each one its own game mode and settings, and handles teleporting between them. It supports current Minecraft versions and runs on Bukkit, Spigot, Paper and Purpur. Creating and importing worlds, per-world game rules, separate inventories and portals are covered in full in Multiverse: Running Several Worlds on One Minecraft Server. Each additional world is more RAM and more chunks being ticked, so treat a resource world as a real cost, not a free feature — see Minecraft Server RAM and JVM Flags for the memory side of that.
Do not try to add worlds by hand on a Bukkit-based server. Extra folders in the server root are not loaded automatically; only the world named in level-name and its dimensions are.
Several servers behind one address. Separate survival, creative and minigame servers that players hop between without disconnecting is not a multi-world problem — it is a proxy network, and it needs a Velocity proxy in front of several server instances. That is a different piece of infrastructure with its own security requirements, covered in Minecraft Server Networks: Setting Up a Velocity Proxy.
The rough dividing line: if the worlds share an economy, a player list and a plugin set, keep them on one server with Multiverse. If they need different jar types, different mod sets, or genuinely different performance profiles, they want to be separate servers behind a proxy.
Common Issues
- "The server generated a new world instead of loading mine":
level-namedoes not exactly match the uploaded folder's name, or the folder is missing itslevel.dat. Check the File Manager listing character by character, capitalisation included. - Nether or End did not reset: You deleted a folder that does not exist on your version. On 26.1 and later there is no
DIM-1; check whether your world has adimensions/folder before following an older guide. - Visible seams or cliffs in the terrain: New chunks were generated under a different seed or a different world-generation version than their neighbours. There is no fix except regenerating one side or building over it.
- World border not applying to the Nether: Expected.
/worldborderis per-dimension — run it again from inside the Nether. - Pre-generation is taking days: The radius is too large.
chunky cancel, set a smaller radius, and start again. Checkchunky progressfor the ETA before committing to a long run. - Server will not start after a manual file change: A stale
session.lock, a partially uploaded world, or a mismatched version. Restore the backup you took first — this is the case it exists for. - World is far larger than expected on disk: Unbordered exploration, or pre-generation without a border. Set a border, then trim the outside with MCA Selector.
What to Read Next
- Minecraft server.properties: The Complete Reference for every key mentioned above
- Getting started with your Minecraft server for first boot and the basics
- Minecraft Server Commands for
/seed,/worldborder,/forceloadand the full gamerule reference - Managing your Minecraft server for backups, memory and the performance side of large worlds
- How to create a backup and How to upload files via SFTP for the mechanics used throughout this guide
- Multiverse: Running Several Worlds on One Minecraft Server for a resource world, a creative world or a hub on this same server
- Minecraft Server Networks: Setting Up a Velocity Proxy if what you actually want is several servers, not several worlds
- Minecraft Flat and Custom World Types for
level-type, superflat layer strings and custom generation, all of which are set before the world first generates - Converting a Singleplayer World to a Minecraft Server: What Changes for game mode, difficulty, cheats and everything else that behaves differently once a save is served
- Editing Minecraft Player Data: UUIDs, NBT Files and Safe Inventory Fixes when the problem is one player's inventory rather than the world
Primary sources used for this guide (all checked 18 August 2026): the Minecraft Wiki on server.properties, the Java Edition level format, Java Edition 26.1, /worldborder, seeds and .minecraft; PaperMC's configuration reference; and the Chunky documentation.
- Best Level for Diamonds in Minecraft — why deep mining is the thing pre-generation actually protects you from
- Minecraft Trial Chambers: Loot, Vaults and Spawners — a structure that only exists in chunks generated since 1.21
- How to Make a Bed in Minecraft — the block that overrides world spawn for an individual player
Made with 💜 by GameServerKings

Need a Minecraft server?
Deploy an instantly-provisioned Minecraft server on high-clock hardware — DDoS protected, no contracts, cancel anytime.
From $4.80 /month